AllWebMenus Pro
Cross-browser support - Multiple menu effects, styles & themes
Powerful menu positioning options - Unicode support - HTML edit capabilities
Multiple rows/columns - Addins/Plugins - Extensions - SEO Friendly - Sitemap support
Save time
No Code - WYSIWYG
Rich UI - For All Browsers
Any Editor - Any CMS
In the sections below you can view some examples on how to position your menu created using the WordPress plugin on your blog depending on the use case.
Example 1: Using a Floating Menu on your WordPress blog
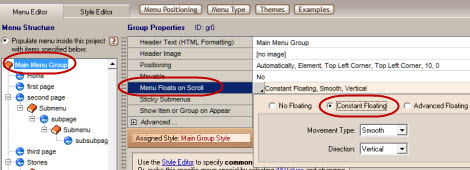
Here we use the "Floating Menu" feature by setting the <Menu Floats on Scroll> property in AllWebMenus to "Constant Floating". This makes the menu float in the same position when the user scrolls the page. The smooth scroll effect is used (you can also use immediate scroll effect).
You can also use the "Advanced Floating Menu Add-in" for conditional floating effects! (not required)
We chose to position the menu "Relative to Window", through the "Positioning" property:
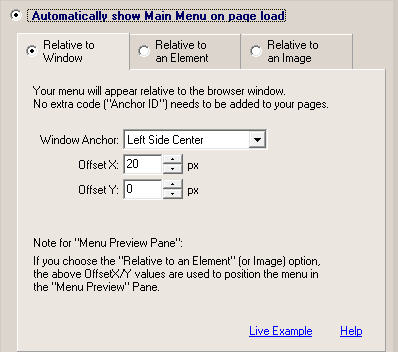
This is how the menu will look in your blog's homepage:
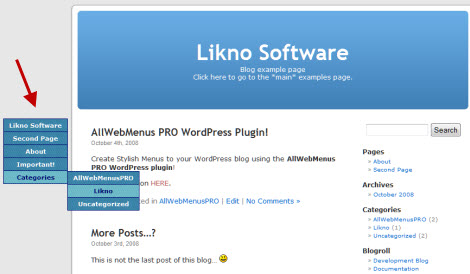
Click on the image to view the example live
(also scroll that page)
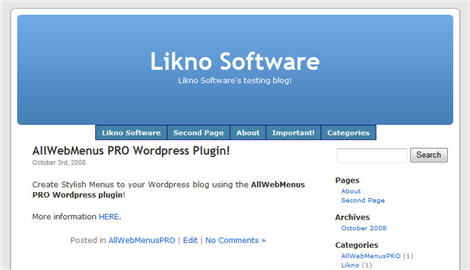
Example 2: Using the Default WordPress Theme
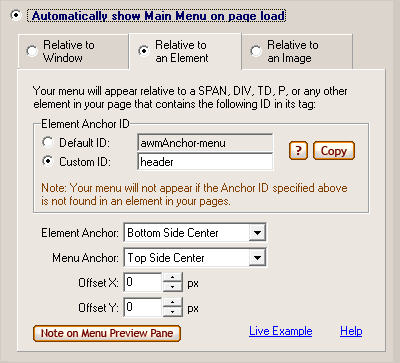
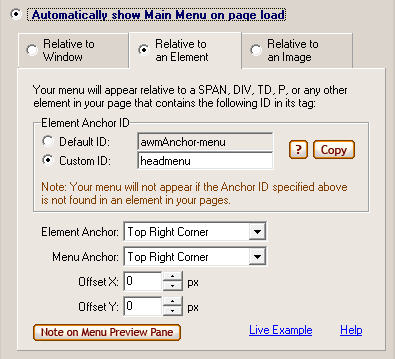
You can position your menu relative to your blog's header when using the Default Theme as displayed in this example. In this example the menu will be placed in the bottom center of the header.
The menu, is positioned by placing the ID of the header tag (in our case a DIV) in the "Custom ID" property under the "Element Anchor ID" options.
These are the settings for the Main Menu Group's "Positioning" property:
This is how the menu will look in your blog's homepage:
Click on the image to view the example live
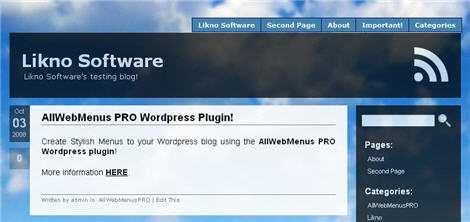
Example 3: Using the "Aeros" Theme
You can position your menu relative to an element in your blog's header when using any Theme. The "Aeros" Theme already contains a default menu that displays the pages of your blog. In this example we have positioned our menu above the default menu in order to replace it and display a more stylish menu that contains more options as items and also subgroups.
The menu, is positioned by placing the ID of the header tag (in our case a DIV) in the "Custom ID" property under the "Element Anchor ID" options.
These are the settings for the Main Menu Group's "Positioning" property:
This is how the menu will look in your blog's homepage:
Click on the image to view the example live
Example 4: Using the "Crafty Cart" Theme
You can position your menu relative to an element in your blog's header when using any Theme. The "Crafty Cart" Theme already contains a default menu that displays the pages of your blog. In this example we have positioned our menu above the default menu in order to replace it and display a more stylish menu that contains more options as items and also subgroups.
The menu, is positioned by placing the ID of the header tag (in our case a DIV) in the "Custom ID" property under the "Element Anchor ID" options.
These are the settings for the Main Menu Group's "Positioning" property:

This is how the menu will look in your blog's homepage:

Click on the image to view the example live
AllWebMenus PRO
Add-ins
See also...
FrontPage Addin Dreamweaver Extension NOF Component Other supported toolsClient Testimonials
"For over 5 years, the Likno Products have been ones of our most trusted web development tools. With excellent support and regular updates."

"Best menu creator tool out there! But best of all is their support! Friendly, knowledgeable, super to work with, and always keeping up with new technology. I wouldn't go anyplace else!"

"We are web developers and simply love your products. You do a superb job of updating them on a regular basis and they always work!"

Awarded as top software by several reviewers
Warning: Constant ABSPATH already defined in /usr/home/frames/public_html/likno/blog/wp-config.php on line 24
Fatal error: __autoload() is no longer supported, use spl_autoload_register() instead in /usr/home/frames/public_html/likno/blog/wp-includes/compat.php on line 502