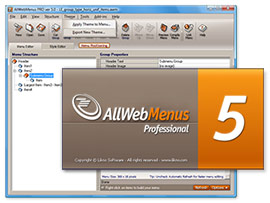
AllWebMenus Pro
Cross-browser support - Multiple menu effects, styles & themes
Powerful menu positioning options - Unicode support - HTML edit capabilities
Multiple rows/columns - Addins/Plugins - Extensions - SEO Friendly - Sitemap support
Save time
No Code - WYSIWYG
Rich UI - For All Browsers
Any Editor - Any CMS
The optional Expression Web Add-in acts as a "bridge" between...
...the AllWebMenus Pro application...
a powerful windows application for creating any kind of navigation menu
&
...your Expression Web site
If you are not aware of the functionality of AllWebMenus, please read the related "Features" page.
Download "AllWebMenus Add-in for Microsoft Expression Web 4"
(note: this download does not apply for Expression Web version 3 or below)
Requirements:
- AllWebMenus v5.3.864 or above. If not already installed, please download its latest version here.
-
Version 4 (or above) of Microsoft Expression Web.
For versions 1 and 2, you may optionally choose to install their Add-ins during the AllWebMenus installation.
How to use AllWebMenus with Microsoft Expression Web
AllWebMenus has a very simple way of linking your menus to your web pages, regardless of the html authoring tool you use. There are different ways to insert the menu to your website pages and this depends on the way your authoring tool is handling the pages:
Integration Method 1: Using the AllWebMenus Expression Web Menu Addin
This method requires that you have installed the "AllWebMenus Add-in" in Expression Web (see above).
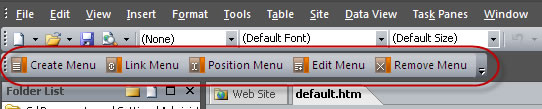
In earlier versions of Expression Web (v1 or v2) the AllWebMenus toolbar will be visible at the top of the application's window:
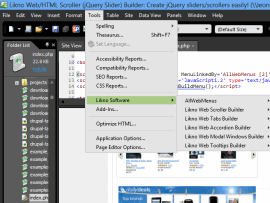
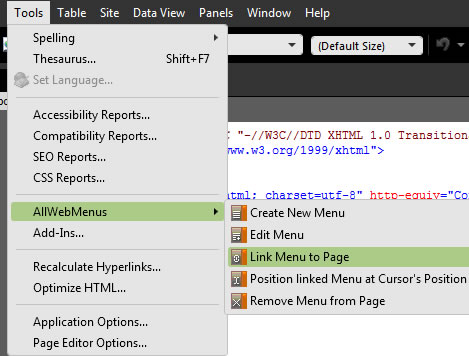
In the latest version (v4) the Add-in commands are available as a submenu of the "Tools" main menu item:
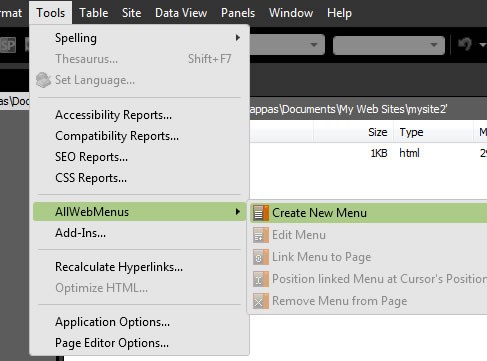
1. Create New Menu
The first step is to "Create New Menu" while a web page or a web site is open in Expression Web. Click on "Create New Menu" and the AllWebMenus standalone application will open for you to create the desired menu. When the menu creation is complete there are a few steps required:
Go to "Project Properties" and set the Site_Root folder (click on "Edit" to select a local folder):
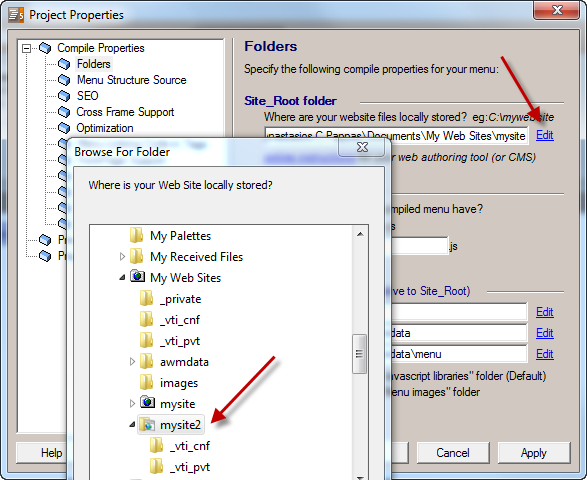
This is also where you must change the "compiled menu name" in case you want to have more than one menus in your site.
Compile the menu. When compilation is complete you will get this window:
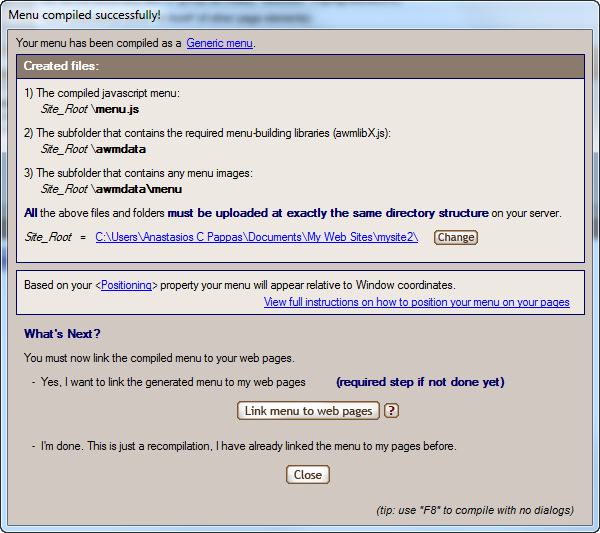
You don't have to "Link menu to web pages" since the process can be done by the AllWebMenus Add-in of the Expression Web later.
Save the project in any location of your local machine (preferrably inside the folder where the rest of the web site files are stored) for future reference.
2. Link Menu
Back to Expression Web, go to Tools --> AllWebMenus --> Link Menu to Page:
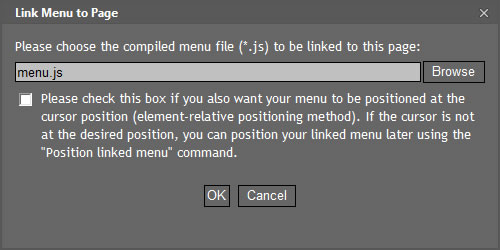
Click on "Browse" to select the js (JavaScript) file created by AllWebMenus when you compiled the project (this file is usually stored in the site's root folder) and press OK:
Check the page's "Code" view and you should see that the menu linking code is added right below the opening BODY tag:
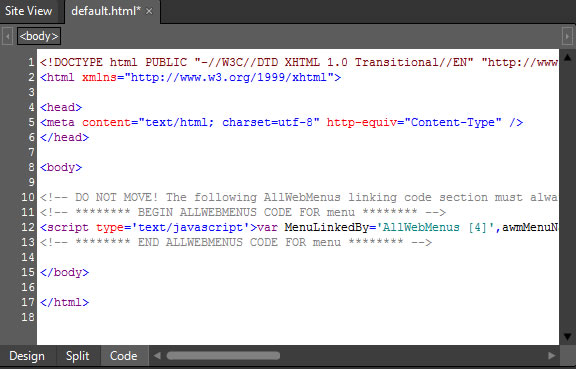
3. Preview Menu
Using the built-in preview function (Super Preview) you can see the menu added in the page:
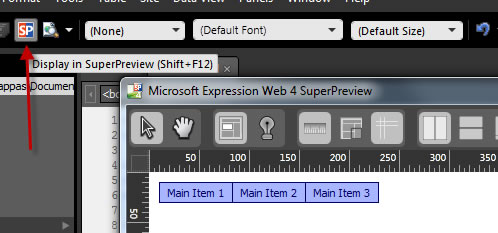
Although you can get a rough idea about how the menu will look like, the most accurate preview method is to see the web page in an external web browser after you publish the web site.
4. Other commands
When at least one menu is created, all other Add-In commands become available:
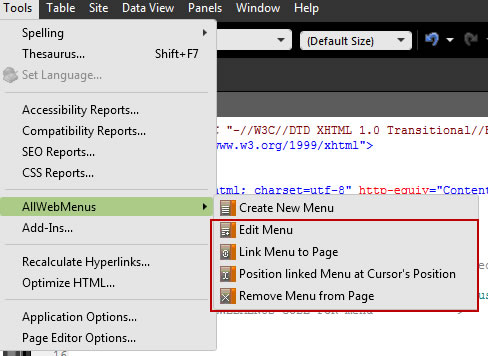
The purpose of each command is obvious by its description:
Edit Menu: Opens the *.awm project you saved during the menu creation. Note that if the location of the *.awm file has changed since the menu is created or if you didn't save any awm file at all, the Add-In will not find it and will asks for its new location.
Link Menu to Page: This is useful when the menu is originally linked in some of the pages and you want to repeat the process for the other pages too. This command asks for the *.js (menu) file that comes from the "Compile" command in AllWebMenus.
Position linked Menu at Cursor's Position: This is a kind of visual aid when you create web pages in "Design" view. The Add-In finds the cursor's exact location and adds a small piece of code for the menu to be re-positioned there.
Remove Menu from Page: Assuming that a menu is already linked in the page, the command will delete it. If you used the "Position linked Menu at Cursor's Position" command, the remaining piece of code (which usually has and "ID" starting with "awmAnchor...") will remain intact to prevent any possible problem with the rest of the page code (some times the menus are using common page elements for their positioning and these cannot be deleted by the Add-In). In this case the anchor code can be deleted manually if it is not used anywhere else.
Integration Method 2: Linking menu to Dynamic Web Templates (DWT),in AllWebMenus
This method does not use the "AllWebMenus Add-in" (not required).
Typically, when you create a new website the files are stored in the folder C:\Documents and Settings\UserAccountName\My Documents\My Web Sites\mysite (unless you change the folder during the website creation). This means that the HTML files that you wish to contain your menu are located inside that folder.
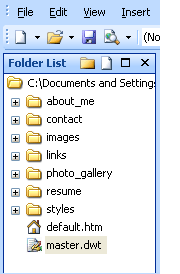
In Expression Web your web site structure will appear as shown in the image at the left:
As you can see one of the files has the extension *.dwt and that means that this file is a Dynamic Web Template.
Unlike Frontpage, Expression Web does not use shared borders (unless you use third party tools to restore this kind of functionality). Instead of this "old approach" the template system has been adopted which is a more flexible way to create and maintain a website.
A Dynamic Web Template is an HTML-based master copy of a web page that you can create to contain settings, formatting, and page elements such as text, graphics, page layout, styles, and regions of a web page that can be modified.
You attach a Dynamic Web Template to the pages in a website, and that template defines the layout for those pages. You can use any number of Dynamic Web Templates in a website, and you can attach a Dynamic Web Template to as many pages as you like.
Since there are no shared borders, all you have to do is to link the menu in the dwt files of your website.
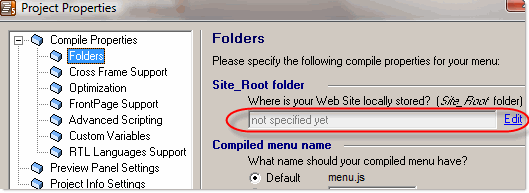
1. Specify your Site Root folder in AllWebMenus
AllWebMenus needs to know where your web site is locally stored. As shown below, click on "Tools -> Project Properties", select the "Folders" option and enter the "Site_Root folder":

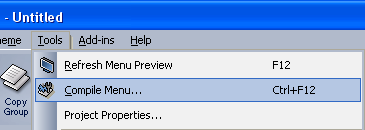
2. Compile your menu
Click on "Tools Compile Menu" to start compiling your menu and linking it to your HTML pages:
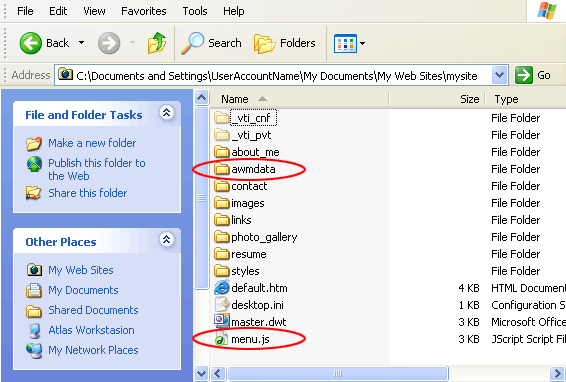
Once you do this step, all the necessary AllWebMenus files will be automatically created inside the C:\Documents and Settings\UserAccountName\My Documents\My Web Sites\mysite folder:
3. Link the menu to your Dynamic Web Template(s)
After you complete the compile process, in the form that appears, select the button that allows you to link the menu to your web pages.
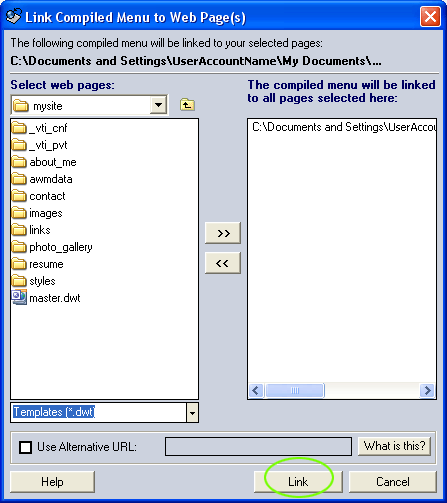
This opens the Link Compiled Menu to Web Page(s) form in order to select the web pages that you wish to contain your menu. You can select many pages at once and link to as many pages as you wish:
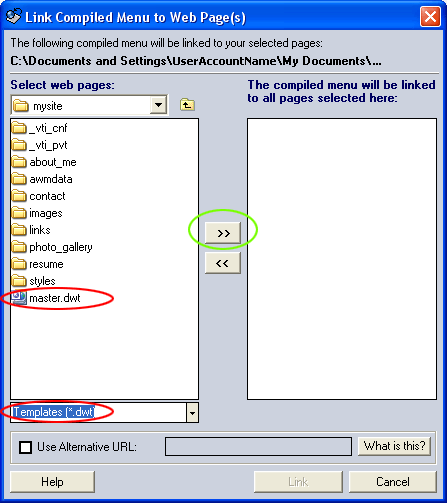
Make sure that you have selected the "Templates (*.dwt)" file type in the combo box below the file list for the master.dwt file to be visible.
Select the master.dwt and/or any other dwt file of your website and press the button shown in the bright green circle to add the file(s) in the list of files where the menu code will be inserted.
This will enable the "Link" button which you will have to click on for the menu linking to be completed:
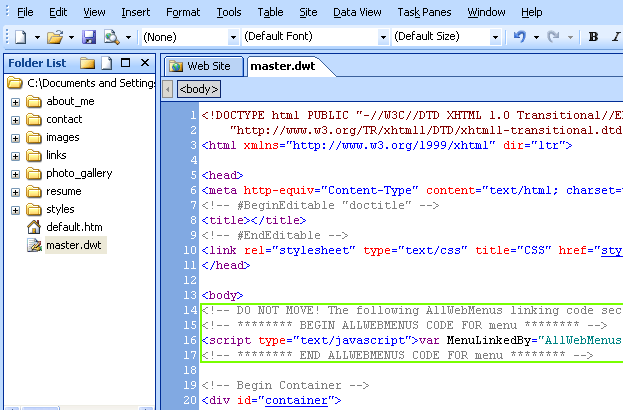
4. Check the Dynamic Web Template updated code
After you complete the linking process, in Expression Web open the master.dwt file and select the "Code" view to see the template code. You will notice that the page is now updated and the AllWebMenus code is inserted just below the <BODY> tag:
That's all! The menu is linked in the template and each time you need to change the menu you have to repeat the 2nd step just for the menu files to be updated. The menu will appear in all html pages attached to the dwt template files where the menu is linked.
Integration Method 3: Linking menu directly to html pages, in AllWebMenus
This method does not use the "AllWebMenus Add-in" (not required).
It is highly recommended to use Dynamic Web Templates to handle a multi-page website in order to keep your files updated in the most easy way. If you don't want to use DWT files (integration method 2 above) or the pages of your website are not so many, you can always link the menu directly in your html files just like in any other web authoring tool. This case is covered in the generic AllWebMenus linking process.
AllWebMenus Pro
All Likno Products
Client Testimonials
"For over 5 years, the Likno Products have been ones of our most trusted web development tools. With excellent support and regular updates."

"Best menu creator tool out there! But best of all is their support! Friendly, knowledgeable, super to work with, and always keeping up with new technology. I wouldn't go anyplace else!"

"We are web developers and simply love your products. You do a superb job of updating them on a regular basis and they always work!"

Awarded as top software by several reviewers
Warning: Constant ABSPATH already defined in /usr/home/frames/public_html/likno/blog/wp-config.php on line 24
Fatal error: __autoload() is no longer supported, use spl_autoload_register() instead in /usr/home/frames/public_html/likno/blog/wp-includes/compat.php on line 502