To add material to your web button you must first click on the Button Material tab.
Define the reflection you want your web button to have and choose the color you want to apply to it. Depending on the button you have selected, it might consist of one Mesh Segment or more. See Mesh Segment examples below.
Example 1 (Mesh Segment 1)

Example 2 (Mesh Segment 2)

In case your button consists of more than one Mesh segment you will need to select the specific segment you will edit and define a reflection for the selected segment.
The reflection refers to how the light reflects on the specific segment of the button. This reflection gives us a view on the material. To do this you can select from the pre-defined ones, such as the Plastic or Metallic options, or customize your own.

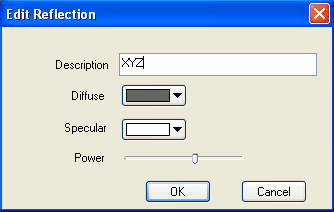
To customize your own simply click on the "Edit" button, and define from the "Edit Reflection" window the values for the Diffuse, Specular and Power options in order to give your web button a glassy, metallic, marble or any other type of reflection and look you want and like.
The combination of the light color and the color reflected by the button gives us the resulting color of the button.
The material of the button results from the combination of colors used in the diffuse and specular parameters. In other words, a combination of a light color in the "Diffuse" parameter and a dark color in the "Specular" parameter, creates a "plastic" looking result. On the other hand, a dark color in the Diffuse parameter and a light color in the Specular parameter, creates a "Metallic" looking result.
By also specifying the "Power" parameter, which determines how intense or soft the light reflection in the button will be, you can create different types of eye-catching and original web buttons.

The above settings take effect only when the button lights are enabled. When all lights are disabled, the only way to define a color for the button is by setting the color property found in this panel. Of course, with disabled lights you will not have the reflections and shadows that give a visual appeal to your buttons.
Finally, you can also add texture to your web button simply by activating the "Texture" check box and clicking on the "Choose" button.
After you click on the "Choose" button, the "Texture" window will open where you can select the texture you want to add to your web button from the existing options and click on the Ok button.
Automatically the relevant changes are made and you can see them directly through the preview window.


