AllWebMenus Pro
Cross-browser support - Multiple menu effects, styles & themes
Powerful menu positioning options - Unicode support - HTML edit capabilities
Multiple rows/columns - Addins/Plugins - Extensions - SEO Friendly - Sitemap support
Save time
No Code - WYSIWYG
Rich UI - For All Browsers
Any Editor - Any CMS
Download the NOF Component
Download the Fusion component
(NOF v7.5 or above)
Download the Fusion component
(NOF v7 users please click this link instead)
Requirement: The extension requires that AllWebMenus v4.2.628 or above (release date: August 25, 2006) is also installed in your computer. If AllWebMenus is not installed in your computer, please download the latest version of AllWebMenus.
Your menus need to be compiled with version 4.2.628 or above for the NOF component to function as expected (older compiled menus need to be re-compiled).
Note: For support requests on NOF and AllWebMenus please contact our Beyond Fusion partner at www.beyondfusion.com.
After you have downloaded both the NOF Component and AllWebMenus please follow the instructions below.
How to use AllWebMenus with NetObjects Fusion
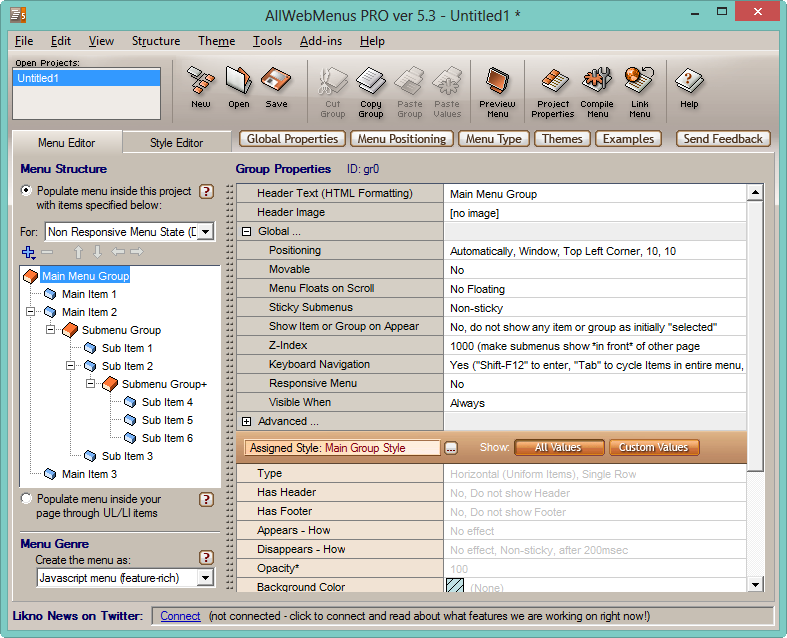
Step 1: Create a compiled menu with AllWebMenus
You should have a menu already created and compiled with AllWebMenus somewhere in your hard drive (example: C:\temp\menu.js).
In case you have not registered AllWebMenus yet and want to evaluate the free component, we have included some sample compiled menus inside the zipped package (under the folder "Sample Menus").
Notes for using AllWebMenus:
- Depending on the Publish Type you are using in NOF,
please pay attention when you enter internal links
at the <URL> property of AllWebMenus. All internal
<URL> links should be relative to the published
ROOT folder:
 By taking this into account you can work with all
three Publish types!
By taking this into account you can work with all
three Publish types!
- by Site Structure ( example for <URL>: page1/page1.html )
- by Asset Type ( example for <URL>: html/page1.html )
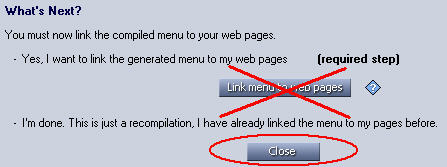
- by Flat ( example for <URL>: page1.html ) - After compiling your menu there is no need to "link" the compiled menu to your pages. The Fusion Component does this for you automatically! So, just ignore this "required" step:
- If you use images in your menu, please make sure that their filenames do not have spaces. This is because NOF converts any space to "_", causing the AllWebMenus javascript to display a missing image instead of the actual image.
Step 2: Add the AllWebMenus component into NetObjects Fusion
Download the Fusion component (NOF v7.5 or above)
Download the Fusion component (NOF v7 users please click this link instead)
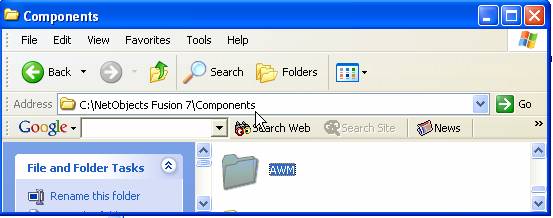
Extract the zipped "AWM" folder into the “Components” folder of your Fusion installation.
This is how the “Components” folder should look like after extracting the "AWM" folder there:
Go to [Publish] …:

… and select the Publish Components:

Check the AllWebMenus support box and press OK:

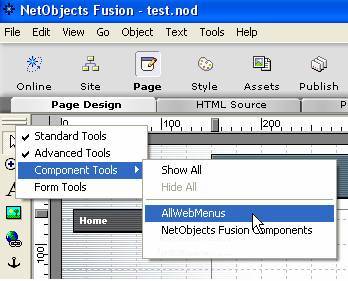
Go to [Page] view …:

… and RIGHT-click on the toolbar to select the AllWebMenus component:
The following icon appears:

Step 3: Add compiled menus into your pages
Click on the AllWebMenus icon and select an area inside your page:

Select a compiled menu created with AllWebMenus (*.js):

The following menu placeholder appears:

When you publish, your compiled menu will appear in place of the placeholder.
Step 4: Publish your site
You are now ready to publish your site. Publish and you can see your menu(s) in action:

This is how it works! You can add as many menus as you like, vertical or horizontal, with images or text and many more!
AllWebMenus Pro
All Likno Products
Client Testimonials
"For over 5 years, the Likno Products have been ones of our most trusted web development tools. With excellent support and regular updates."

"Best menu creator tool out there! But best of all is their support! Friendly, knowledgeable, super to work with, and always keeping up with new technology. I wouldn't go anyplace else!"

"We are web developers and simply love your products. You do a superb job of updating them on a regular basis and they always work!"

Awarded as top software by several reviewers
Warning: Constant ABSPATH already defined in /usr/home/frames/public_html/likno/blog/wp-config.php on line 24
Fatal error: __autoload() is no longer supported, use spl_autoload_register() instead in /usr/home/frames/public_html/likno/blog/wp-includes/compat.php on line 502