AllWebMenus Pro
Cross-browser support - Multiple menu effects, styles & themes
Powerful menu positioning options - Unicode support - HTML edit capabilities
Multiple rows/columns - Addins/Plugins - Extensions - SEO Friendly - Sitemap support
Save time
No Code - WYSIWYG
Rich UI - For All Browsers
Any Editor - Any CMS
The optional Dreamweaver Extension acts as a "bridge" between...
...the AllWebMenus Pro application...
a powerful windows application for creating any kind of navigation menu

&
...your Dreamweaver site
If you are not aware of the functionality of AllWebMenus, please read the related "Features" page.
Download the Dreamweaver Extension
(unzip the file and read installation instructions below)
Requirements:
- Dreamweaver version 8 (2005) or greater.
- AllWebMenus version 5 installed. If not, please download the latest version of AllWebMenus.
Installation Instructions:
Inside the zip file, you will find the AllWebMenus.mxp file. Extract it somewhere and double-click it to install the extension in Dreamweaver. If a previous version of this Extension is already installed, please uninstall first the old version prior to installing the new one.
If you encounter one of the following installation problems...
- Error message saying that the "file AllWebMenusStartup.htm could not be loaded"
OR
- Error message (on Windows Vista only) saying
"The file 'C:\Program Files\Macromedia\Dreamweaver8\Help\awm_dw_help.chm' is being used by Dreamweaver 8. Please close Dreamweaver 8 and try again."
... then you must have an older version of this Extension already installed. Just make sure that you download the latest version of the Dreamweaver extension (from link above) and install this version.
How to use AllWebMenus with Dreamweaver
AllWebMenus has a very simple and intuitive way for linking your menus to your web pages, with or without the help of the Dreamweaver Extension. The Dreamweaver Extension is not required for using AllWebMenus with Dreamweaver; however, it strongly facilitates the menu-linking and menu-positioning processes.
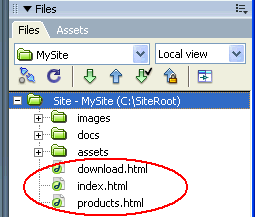
Step 1: Specify the HTML pages where your menu will appear
Suppose that you are using your favorite web authoring tool to create a web site under the C:\SiteRoot local folder. This means that the HTML files that you wish to contain your menu are located inside that folder:
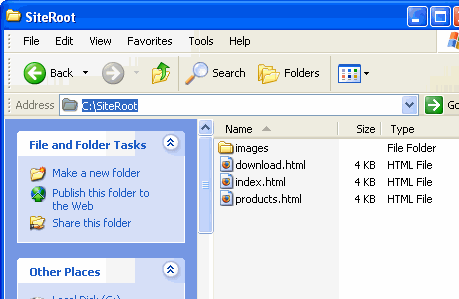
In DreamWeaver your web site structure will appear as follows:
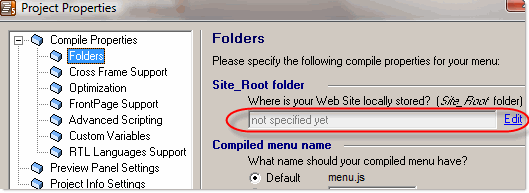
Step 2: Specify your Site Root folder in AllWebMenus
AllWebMenus needs to know where your web site is locally stored.
As shown below, click on "Tools Project Properties", select the "Folders" option and enter the "Site_Root folder":

Step 3: Choose your positioning method
There are three ways to position your menu:
- Relative to Window
By default, the menu appears at its "Relative to Window" positioning coordinates that are specified at design time within AllWebMenus. In this case you do not need to take any further action to position your menu, apart from just linking the menu to the page.
- Relative to an Element on the page (eg: span, div, table, td, etc.)
However, if you want your menu to be positioned related to a page element, then some extra piece of code needs to be inserted next to that page element. To do so, place your cursor at your desired location inside your page and then press the "Position linked menu at cursor's position" command. This automatically inserts a span element that contains the related "Anchor ID" at that particular location of your page. You must also make sure when designing your menu that you choose the "Relative to an Element" positioning at the <Positioning> property of the Main Menu group, as shown in the picture below:
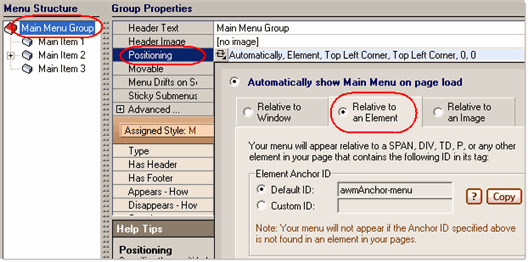
Failing to do so will cause your menu to appear at the "Relative to Window" position instead (if this default option is selected on the project).
- Relative to an Image on the page (eg: "logo.gif")
Similarly to the "Relative to Window" option, this option does not require any additional code on the page (apart from the menu-linking code).
The menu is positioned where the image is also positioned.
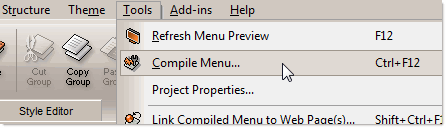
Step 4: Compile your menu
Click on "Tools Compile Menu" to start compiling your menu and linking it to your HTML pages:
Once you do this step, all the necessary AllWebMenus files will be automatically created inside the C:\SiteRoot folder:
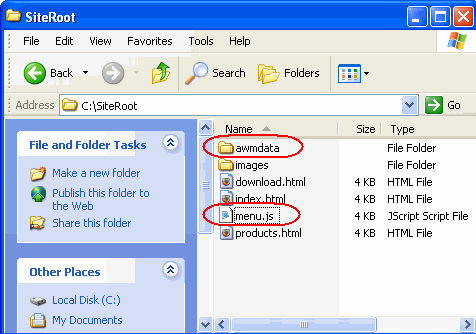
In case you have not registered AllWebMenus yet and want to evaluate the free extension, we have included some sample compiled menus inside the zipped package of the extension (under the folder "Sample Menus").
Step 5: Link your menu to your web pages
The menu-linking process can be achieved in two different ways, either using the AllWebMenus interface or the Dreamweaver Extension interface:
Option 1
Using the AllWebMenus menu-linking process (good for linking to multiple pages at once)
In the form that appears after the compile, select the button that allows you to link the menu to your web pages.
This opens the following form in order to select the web pages that you wish to contain your menu. You can select many pages at once and link to as many pages as you wish.
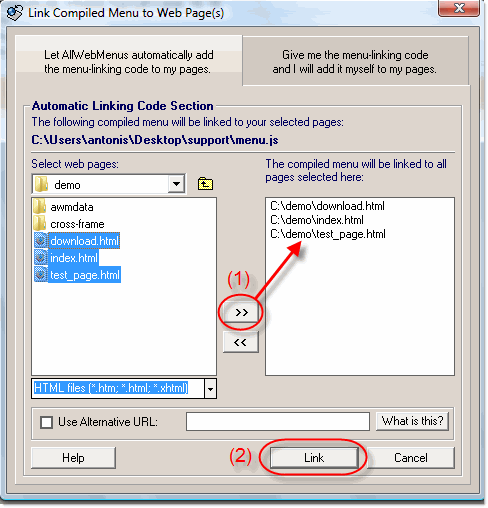
This process adds to your selected HTML files the necessary javascript code that builds your menu.
Option 2
Using the Dreamweaver Extension menu-linking process (intuitive, within DW interface)
After compiling your menu just skip the "Link menu to web pages" required step; click "Close" instead:

Open your page in Dreamweaver and click the following Extension item:
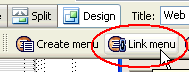
This will automatically create the link to your compiled menu; i.e. the necessary menu-linking code will be added to your HTML.
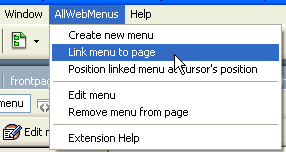
Step 6: Position your menu inside your web page
This process requires that you have first linked your menu to your page.
After you have linked your menu to the page, position the cursor at your desired position in the page (Design or Code view) and click the following Extension item:

This action will add the menu-positioning code to the specified location and the menu will appear there when browsing the page.
Important: Make sure that the "Element" value is selected at the AllWebMenus <Positioning> property of the Main Menu Group {gr0}, before you compile the menu.
You can also specify the alignment of the menu through the properties
of this <Positioning> property. Read more on the <Positioning> property and techniques online or by pressing "F1" while you have this property selected in AllWebMenus.
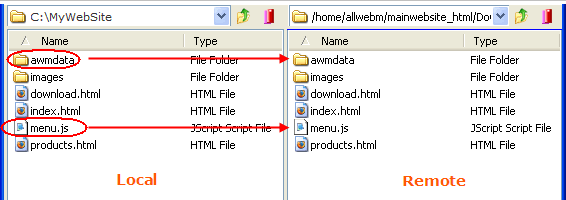
Step 7: Publish your updated web pages and your compiled menu files
Use Dreamweaver to upload all the necessary files to your web server.
Remember to upload all the AllWebMenus files at the exact same position as they are created inside your local site structure (i.e. inside the C:\SiteRoot folder).
After uploading all the necessary files, your remote site should appear as follows:
Enjoy your menus online!
Testimonials for the Dreamweaver Extentension
"Holy smokes! I just got Dreamweaver and was having a little bit of difficulty creating menus, etc. with their built in software; however, the AllWebMenus extension for Dreamweaver is soooooooooo easy to use.
I am going to recommend this extension to all of my fellow teachers at the next professional development day for IT teachers. Again, amazing, amazing, amazing job. You guys are the best kept secret on the net!"
Rick Delainey
Information Technologies teacher at LCBI High School
Outlook, Saskatchewan, Canada
AllWebMenus Pro
All Likno Products
Client Testimonials
"For over 5 years, the Likno Products have been ones of our most trusted web development tools. With excellent support and regular updates."

"Best menu creator tool out there! But best of all is their support! Friendly, knowledgeable, super to work with, and always keeping up with new technology. I wouldn't go anyplace else!"

"We are web developers and simply love your products. You do a superb job of updating them on a regular basis and they always work!"

Awarded as top software by several reviewers
Warning: Constant ABSPATH already defined in /usr/home/frames/public_html/likno/blog/wp-config.php on line 24
Fatal error: __autoload() is no longer supported, use spl_autoload_register() instead in /usr/home/frames/public_html/likno/blog/wp-includes/compat.php on line 502