AllWebMenus Pro
Cross-browser support - Multiple menu effects, styles & themes
Powerful menu positioning options - Unicode support - HTML edit capabilities
Multiple rows/columns - Addins/Plugins - Extensions - SEO Friendly - Sitemap support
Save time
No Code - WYSIWYG
Rich UI - For All Browsers
Any Editor - Any CMS
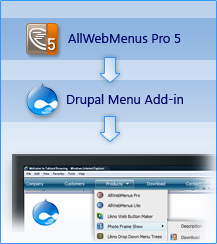
The AllWebMenus Drupal Menu add-in and the Likno JavaScript/CSS Menus module combination is designed to retrieve information from your Drupal site (such as pages, stories etc.) and import it into the AllWebMenus application to create stylish, feature-rich navigation menus, and not only! Create menu items derived from your site's structure AND/OR fully customize your menus adding your own non-drupal menu items with external or internal links, html-rich content, colors, borders, effects, designs of your choice and many more!
The solution consists of a combination of 2 parts:
1. The AllWebMenus Add-in
This already exists inside your AllWebMenus installation (v5.3.860 or above only - no need to download and install separately), and can be accessed through the following menu:
You can use the add-in to specify the site's domain you create a menu for, import/update the menu structure from your site and eventually compile the menu for use on your Drupal website.
Click here for licensing details.
2. The Likno JavaScript/CSS Menus Module
This is the module that you need to install on your Drupal website.
Through the module you can choose what information of your site should be part of your menu (like pages, stories, etc.), with what menu hierarchy and what options.
The module provides two different options for the generation of the menu: the AllWebMenus application or the Superfish script.
1. Menu generation using the "AllWebMenus" option:
The module generates the Menu Structure Code to paste into the Add-in of your AllWebMenus installation. You can then further process your menu with the hundreds of options that the AllWebMenus desktop application offers and compile/upload it to your Drupal website.
Note that you are not restricted to the Drupal menu structure for your menu items. You can create menus with your own menu items regardless of the drupal menu structure (see "Static" or "Mixed" population method below).
The Drupal module supports 3 menu population methods:
- "Dynamic" population: The menu is populated with items dynamically (online), based on a Drupal menu. The AllWebMenus project is used to provide only the styling/behaviors of the menu; not its items.
- "Static" population: The menu is populated with items edited within AllWebMenus only. Any changes to your online website do not affect your menu items. So, AllWebMenus provides both the structure and the styling/behaviors of the menu.
- "Mixed" population: This is a mix of "Dynamic" and "Static". The menu is populated both with items edited within AllWebMenus and with items created online (through a Drupal menu).
more information about configuring your menu using AllWebMenus
2. Menu generation using the "Superfish" option:
The module generates all the necessary code for the menu generation - there is no need to use the AllWebMenus application. Once the content of the menu has been specified, the positioning, style and behavior of the menu are determined through managing the appropriate "Blocks" in the Drupal administration page.
more information about configuring your menu using Superfish
Download and install the Likno JavaScript/CSS Menus Module on Drupal
Step 1: Download the module's zip file
| Release Version: | 1.1.5 what's new |
| License / Size: |
GNU/GPL 128 KB |
| Requirements: |
This "Module" version (i.e. code installed on Drupal) requires AllWebMenus PRO v5.3.860 or above in your PC (click [About] on its [Help] menu to view its version). Download the latest AllWebMenus if not installed yet. The "Add-in" (i.e. code within AllWebMenus) is already included with the installation (since v5.3.860, Mar. 2011), so no separate download link exists for install. |
Step 2: Install the module to your Drupal website
- Extract the file you downloaded in the previous step.
- Upload the entire likno_menus folder (not just the files inside) to your modules directory in your Drupal site (ROOT/sites/all/modules/).
- Activate the module in your module administration panel (found at "Administer Site building").
Both Drupal 7 and 6
- Go to "Admin Modules Install New Module".
- Browse for the file you downloaded in the previous step and select it.
- Press the install button.
- Activate the module in your module administration panel (found at "Administer Site building").
New Install Option only for drupal 7
Configure and use the "Likno JavaScript/CSS Menus Module" on Drupal (for use with AllWebMenus)
Step 1: Configure your menu
While in Drupal:
- Login to the Admin area of your Drupal site.
- Go to the Likno JavaScript/CSS Menus module options.
- Configure the menu options of one (or more) of the menus.
- Click "Generate menu structure code and save configuration".
- Copy the generated code of the menu that you want.
Switch to the AllWebMenus desktop application:
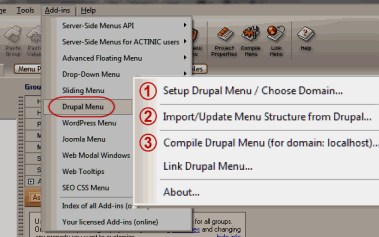
- Go to the "Add-ins Drupal Menu" options:
- Choose the "Import/Update Menu Structure from Drupal" option (item [2] on screenshot).
- Paste the "Menu Structure Code" previously copied from Drupal.
- Further configure your menu (colors, borders, effects, styles, etc.) through the AllWebMenus properties and/or add custom items with their own external or internal links.
Step 2: "Link" your menu to your Drupal pages
Normally the "Linking Code" is added automatically by the module, so you do not need to do anything else.
However,
in certain configurations the module reports that the code cannot be automatically added. In such configurations you have to add it manually:
- In Drupal 6: Open the page.tpl.php file of the theme you are using (should be in the "/YourThemePath/" folder) in a text editor.
- In Drupal 7: Open the html.tpl.php file of the theme you are using (should be in the "/YourThemePath/templates" folder) in a text editor.
-
Add the following menu Linking Code RIGHT AFTER the opening <body> tag in the above file:
(the above is the special "Linking Code" for Drupal implementations)
Step 3: Choose menu "positioning"
There are 3 different ways to position your menu in your pages:
- "Relative to Window"
You can position your menu relative to the browser window:
 You do not need to do anything else for this option.
- "Relative to an Element"
You can position your menu relative to a "block" element that exists in all pages of your Drupal site.
For each menu enabled in the Likno JavaScript/CSS Menus module, a "block" is also generated that can be positioned inside your Drupal pages through the "Blocks" administration page.
In AllWebMenus, choose the "Relative to an Element" positioning option, and select the "Default ID" property:
 Don't forget to also adjust the "Element Anchor", "Menu Anchor" and positioning "Offsets".
- "Relative to an Image"
You can position your menu relative to a common image that exists in all pages of your Drupal site.
Find the filename of that image...

...and enter it at the "Image Filename" property:

Don't forget to also adjust the "Element Anchor", "Menu Anchor" and positioning "Offsets".
View how positioning works through detailed examples/use cases
Step 4: Setup, Compile and Upload the menu files
While in AllWebMenus:
- Compile the menu using the "Add-ins Drupal Menu Compile Drupal Menu" (item [3] on screenshot).
Note: When asked for "Site_Root folder" use any local folder on your hard drive you like for the compiled files to be produced.
- Upload the compiled menu files (found at the above mentioned local folder) on the exact online folder you specified when configuring the module options in Drupal (default is 'menu' - create new folder if it does not exist).
You can use the module upload form to do it. Go to module options select the approriate menu and follow the instructions below to upload it (you can also check the screenshot below the instructions).
- Press the "file browse" button (item [1] on screenshot).
- Go to the folder where your menu was compiled by AllWebMenus (item [2] on screenshot).
- Select the compiled ZIP file and press open (item [3] on screenshot).
- Press "Upload ZIP file containing source of AllWebMenus" (item [4] on screenshot).

Note: The name of the menu is the one that you selected in the options of the module (default is 'menu'). You can change these options in the 'Tools > Project Properties > Folders' in the AllWebMenus application. It is strongly recommended not to edit the above properties, just leave the default values (change them only if advanced use cases are required).
Configure and use the "Likno JavaScript/CSS Menus Module" on Drupal
(for use with Superfish)
Step 1: Configure your menu
- Login to the Admin area of your Drupal site.
- Go to the Likno JavaScript/CSS Menu module options.
- Configure the menu contents of one (or more) of the menus.
- Save the changes of all the modified menus by clicking "Save configuration".
Step 2: Choose menu "positioning"
- Go to the "Blocks" administration page.
- Select in which area of your Drupal site you want the menu to appear by choosing it from the list or by dragging and dropping the appropriate Block under that area.
Step 3: Configure the appearance and the behavior of the menu
- In the "Blocks" administration page, click "configure" on the Block you wish to modify.
- Set the options to the desired appearance and behavior of the menu, and save the configuration.
AllWebMenus PRO
Add-ins
See also...
FrontPage Addin Dreamweaver Extension NOF Component Other supported toolsLike the AllWebMenus Drupal Addin/Module?
If you like the AllWebMenus Drupal Menu add-in & module please feel free to add a review at the Drupal.org site.
Client Testimonials
"For over 5 years, the Likno Products have been ones of our most trusted web development tools. With excellent support and regular updates."

"Best menu creator tool out there! But best of all is their support! Friendly, knowledgeable, super to work with, and always keeping up with new technology. I wouldn't go anyplace else!"

"We are web developers and simply love your products. You do a superb job of updating them on a regular basis and they always work!"

Awarded as top software by several reviewers
Warning: Constant ABSPATH already defined in /usr/home/frames/public_html/likno/blog/wp-config.php on line 24
Fatal error: __autoload() is no longer supported, use spl_autoload_register() instead in /usr/home/frames/public_html/likno/blog/wp-includes/compat.php on line 502