AllWebMenus Pro
Cross-browser support - Multiple menu effects, styles & themes
Powerful menu positioning options - Unicode support - HTML edit capabilities
Multiple rows/columns - Addins/Plugins - Extensions - SEO Friendly - Sitemap support
Save time
No Code - WYSIWYG
Rich UI - For All Browsers
Any Editor - Any CMS
Information
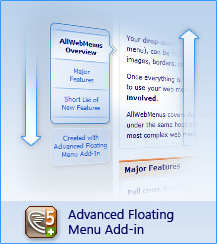
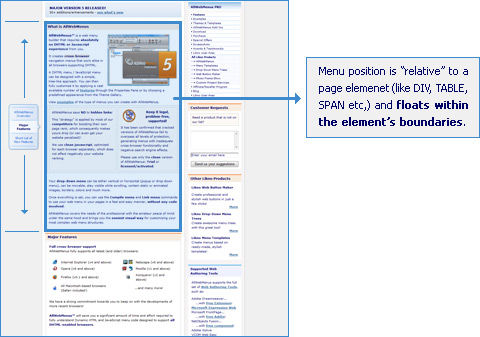
This AllWebMenus Add-in is related to the <Menu Floats (drifts) on Scroll> Main Menu property, which comes with two options:
1. The "Constant Floating Menu" option (standard), which makes the menu "float" all the way through the page towards the scrolling direction.
2. The "Advanced Floating Menu" option (through the Add-in), which allows for more customization (such as floating behavior within specific sections of the page) and for different and interesting navigation cases within the page.
To see the capabilities of this Add-in please view some of the available Use Cases of the "Advanced Floating Menu Add-in":
View how it works through detailed examples/use cases
Download/Installation Instructions
Note: Since Build 766 (March 11, 2009) the Add-in is already installed inside AllWebMenus. Therefore, you do not need to do the following steps if you have downloaded AllWebMenus from that date and above.
Step 1: Make sure you have v5.1.740 or above installed
The Advanced Floating Menu Add-in requires that AllWebMenus PRO v5.1.740 (released on June 23, 2008) or above is also installed on your computer.
To find out the version of your current AllWebMenus installation, open the program, click the [Help] menu and then the [About] item.
Download the latest AllWebMenus version
if you do not have it installed yet.
Step 2: Download the Add-In Setup file
| Release Version: | 1.0.2 what's new |
| Download link: | Not needed, this Add-in version is pre-installed in AllWebMenus Build #742 or above.
If you have an earlier version of AllWebMenus, download its latest version from the AllWebMenus download page (this will also install the latest Add-in version). |
| Requirements: | AllWebMenus PRO v5.1.740 or above (initial Add-in version) |
Step 3: Step 3 - Run the Setup file
Before that, make sure that you close the AllWebMenus application, if it is open. The contents of the setup file should be extracted inside the folder where your AllWebMenus is installed. If you haven't changed this, it should be a path similar to the following:
C:\Program Files\AllWebMenus5
The end result should be a subfolder like the following:
C:\Program Files\AllWebMenus5\AddIns
Every AllWebMenus add-in is always a subfolder of the AddIns folder.
Final Step: Close and re-open your AllWebMenus
Open AllWebMenus (if it was already open please close it first and then install the add-in) and click on the [Add-ins] menu on the menu bar. You should now be able to see the "Server-Side Menus API" item on this menu. You are now ready to use the Add-In!
License/Purchase Information
Click below to find purchase and licensing information about the Add-in:
AllWebMenus PRO
Add-ins
See also...
FrontPage Addin Dreamweaver Extension NOF Component Other supported toolsFloating Menu Examples
Check out ready-made menu examples/use cases of stylish floating menus created with AllWebmenus<
Click on the link below to view our Menu Theme Gallery:
Floating Menu ExamplesClient Testimonials
"For over 5 years, the Likno Products have been ones of our most trusted web development tools. With excellent support and regular updates."

"Best menu creator tool out there! But best of all is their support! Friendly, knowledgeable, super to work with, and always keeping up with new technology. I wouldn't go anyplace else!"

"We are web developers and simply love your products. You do a superb job of updating them on a regular basis and they always work!"

Awarded as top software by several reviewers
Warning: Constant ABSPATH already defined in /usr/home/frames/public_html/likno/blog/wp-config.php on line 24
Fatal error: __autoload() is no longer supported, use spl_autoload_register() instead in /usr/home/frames/public_html/likno/blog/wp-includes/compat.php on line 502