AllWebMenus Pro
Cross-browser support - Multiple menu effects, styles & themes
Powerful menu positioning options - Unicode support - HTML edit capabilities
Multiple rows/columns - Addins/Plugins - Extensions - SEO Friendly - Sitemap support
Save time
No Code - WYSIWYG
Rich UI - For All Browsers
Any Editor - Any CMS
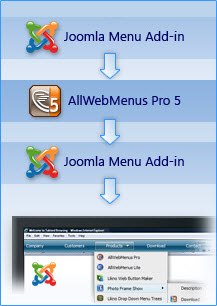
The AllWebMenus Joomla Menu add-in & component combination is designed to retrieve your Joomla menu from your Joomla website and import it into the AllWebMenus application to create stylish, feature-rich navigation menus, but not only!
Apart from creating menu items derived from your joomla menu structure, you can also fully customize your menus by adding your own non-Joomla menu items with external or internal links, html-rich content, colors, borders, effects, designs of your choice and many more!
The solution consists of a combination of 2 parts:
Our AllWebMenus Pro application... (1/2)
Use the application's "Joomla Menu Add-in" to setup your menu for your specific Joomla website, import/update the menu structure from there and eventually compile the menu for use on your Joomla website. Licensing details.
& ...our special Joomla Component for AllWebMenus Pro (2/2)
Install the component online on your Joomla website.
Through the component you can choose your Joomla menu (created by the default menu module), what information of your site should be part of your menu, with what menu hierarchy and what options.
Note that you are not restricted to the joomla menu structure for your menu items. You can create menus with your own menu items regardless of the joomla menu structure (see "Static" or "Mixed" population method below).
The Joomla component supports 3 menu population methods:
- "Dynamic" population: The menu is populated with items dynamically (online), based on a Joomla menu. The AllWebMenus project is used to provide only the styling/behaviors of the menu; not its items.
- "Static" population: The menu is populated with items edited within AllWebMenus only. Any changes to your online website do not affect your menu items. So, AllWebMenus provides both the structure and the styling/behaviors of the menu.
- "Mixed" population: This is a mix of "Dynamic" and "Static". The menu is populated both with items edited within AllWebMenus and with items created online (through a Joomla menu).
Watch how you can Download AllWebMenus Joomla Component, install it and use it.
Download and install the AllWebMenus Component on your Joomla website
Step 1: Download the component's ZIP file
Download Component for Joomla v3+
Download Component for Joomla v1.6-v2.5
For Joomla v1.5 or below, click here
Important Note! If you are updating from an older version, note that the instructions have changed and an extra step is now required for your menu to show (see at the end of the page).
| Release Version: | 1.2.6 (for Joomla v3+), 1.1.15 (for Joomla v1.6-v2.5) what's new |
| License / Size: |
GNU/GPL 18.5 KB |
| Requirements: |
AllWebMenus PRO v5.3.930 or above. Download latest AllWebMenus if not installed yet. Note: the "Add-in" (not the "plugin") is already included inside your AllWebMenus installation. |
Step 2: Install the component to your Joomla site
- Login to your Joomla administrator area
- Install the component by selecting the "Extensions > Extension Manager" item of the Joomla administration menu
Configure and use the "AllWebMenus Component" on Joomla
Step 1: Configure your menu
While in Joomla:
- Login to the Admin area of your Joomla site
- Go to the "Components -> AllWebMenus Pro" item of the Joomla administration menu
- Configure the menu options
- Click "Generate Menu Structure Code"
- Copy the generated code
Switch to the AllWebMenus desktop application:
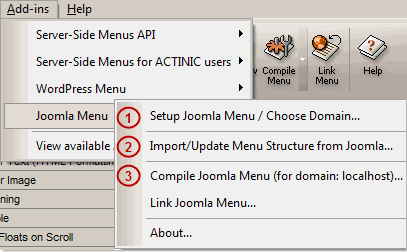
- Go to the "Add-ins -> Joomla Menu" options:
- Choose the "Import/Update Menu Structure from Joomla" option (item [2] on screenshot)
- Paste the "Menu Structure Code" previously copied from Joomla
- Configure further your menu (colors, borders, effects, styles, etc.) through the AllWebMenus properties or add your own custom items with their own external or internal links
Step 2: Choose menu "positioning"
While in AllWebMenus, choose the Positioning property:
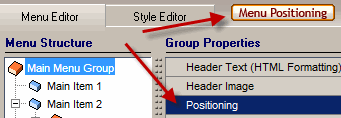
There are 3 different ways to position your menu in your pages:
- "Relative to Window"
You can position your menu relative to the browser window: - "Relative to an Element"
You can position your menu relative to a common element that exists in all pages of your Joomla site.
I order to do so, you need to find and copy the id of that element by viewing the source code of a Joomla page ("Preview" function). Since Joomla does not add an id to all page elements, you need to choose an element that does have one.
 In AllWebMenus, choose the "Relative to an Element" positioning option and paste the copied id value at the "Custom ID" property.
 Don't forget to also adjust the "Element Anchor", "Menu Anchor" and positioning "Offsets".
- "Relative to an Image"
You can position your menu relative to a common image that exists in all pages of your Joomla site.
Find the filename of that image...
 ...and enter it at the "Image Filename" property:
 Don't forget to also adjust the "Element Anchor", "Menu Anchor" and positioning "Offsets".
This is the recommended positioning method as it is easier than the "element" one, which requires an id but Joomla does not always create an id for all elements.
We also provide a placeholder image for you to use if you do not want to use one of your existing images for positioning. This is a transparent 1x1 image, named allwebmenusanchor.gif and can be found in the "AddIns Joomla" subfolder of the AllWebMenus installation.
 You can add a Custom HTML Module in Joomla (Module Manager New Custom HTML) and import this image there.

View how positioning works through detailed examples/use cases
Step 3: Setup, Compile and Upload the menu files
While in AllWebMenus:
- Compile the menu using the "Add-ins Joomla Menu Compile Joomla Menu" (item [3] on screenshot).
Note: When asked for "Site_Root folder" use any local folder on your hard drive you like for the compiled files to be produced.
These files will be added in a ZIP file that will contain all the necessary menu files. - Upload the compiled menu (the ZIP file mentioned above) via the Joomla administrator area. Go to "Components AllWebMenus Upload Compiled Menu ZIP file", select the menu file from the location you selected above and upload it. Your AllWebMenus menu has been successfully uploaded and installed. You will now be able to view the menu on your Joomla website.
- If you do not see the menu, please check one of the following:
- You forgot to enable the AllWebMenus menu through the "Plugin Manager"
- Your menu is positioned "Relative to an Element" (or Image) but you did not specify an available "Element ID" or "Image Name" in the related property of AllWebMenus
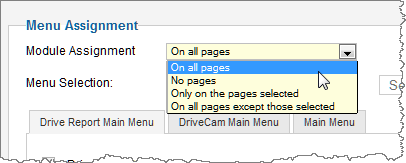
- You forgot to set the Module to appear in all
pages:
AllWebMenus PRO
Add-ins
See also...
FrontPage Addin Dreamweaver Extension NOF Component Other supported toolsTrue Testimonials
"I'm a web designer, specializing in Joomla sites. I'd much rather spend my time focusing on the site, rather than spending hours constructing menus and making sure they work in all browsers. Your component allows me to do that easily.
FYI, I had been using another Joomla menu component, swm****** for all my sites, but it had a lot of cross-browser issues and other problems. I love the customization possibilities with yours and hope you continue supporting Joomla!"
Again THANK YOU!
Vicki Watson
www.vwebdesign.net
Client Testimonials
"For over 5 years, the Likno Products have been ones of our most trusted web development tools. With excellent support and regular updates."

"Best menu creator tool out there! But best of all is their support! Friendly, knowledgeable, super to work with, and always keeping up with new technology. I wouldn't go anyplace else!"

"We are web developers and simply love your products. You do a superb job of updating them on a regular basis and they always work!"

Awarded as top software by several reviewers
Warning: Constant ABSPATH already defined in /usr/home/frames/public_html/likno/blog/wp-config.php on line 24
Fatal error: __autoload() is no longer supported, use spl_autoload_register() instead in /usr/home/frames/public_html/likno/blog/wp-includes/compat.php on line 502